Third-party and built-in Web browser pop-up blockers should be disabled for proper Web Client Printer functionality.
After installing the Web Client Printer driver, Windows-based applications are ready to send faxes using the FaxPress server, and without the need to launch the FaxPress Plus Windows client.
To print using the FaxPress Web Client Printer driver:
| 1. | In any Windows-based application that has the Print dialog available, click Print... The Print dialog appears, as shown. |

| 2. | Configure any custom print settings. You can click Properties for more options. Once you are done configuring any other options, you can click OK to confirm, or Cancel to exit without making changes. |
| 3. | In the Print dialog box (shown in step 1), click OK to print. The Web Client Printer Compose Fax dialog box appears in a web browser window. |
If you have not logged in to the Web Client interface, you will be prompted to do so. Using the Web Client Interface to log in to the Web Client Interface.
The Web Client Printer Compose Fax dialog contains the same options and features as the FaxPress Plus Windows client. About the FaxPress Premier Send Fax Interface in the FaxPress Premier User Guide for more information.
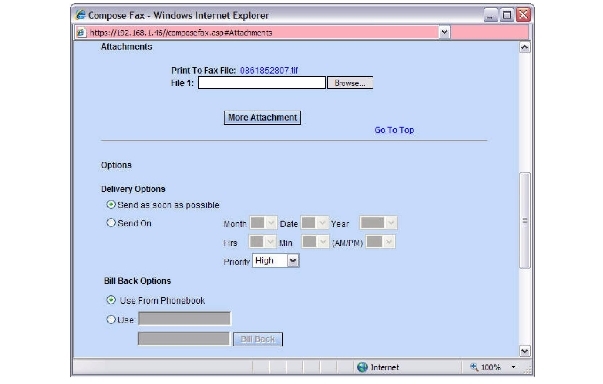
| 4. | To attach a document to the outgoing fax, click Attachments. The Attachments section will be displayed. Click Browse..., locate the file on the local machine that you wish to attach, then click OK. To attach more files, click More Attachments. |
| 5. | When you are finished, click Send Fax in the upper right-hand corner of the Compose Fax dialog to send the fax. 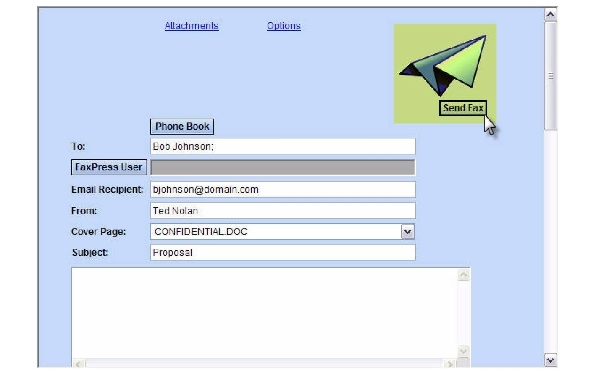 |
|
FaxPress Premier WebHelp
Last Updated: 11/1/2007
E-mail this page |
Castelle 855 Jarvis Drive, Suite 100 Morgan Hill, CA 95037 Toll-free 800.289.7555 Tel 408.852.8000 Fax 408.852.8100 |